Thursday, May 7, 2009

Assignment #5


Here is a link to the animation I designed for assignment five, and here is a link to the .max file.

After some thought, I decided that the Kinetic Sculpture assignment would be the most fun (and the least tedious) to do. My goal for this project was to make some of the sculptures I made in assignment #2 appear to interact with one another, whilst moving around and acting alive.

At first, I had difficulty aligning all of my keyframes; some of the ones that I added would activate earlier than when they were supposed to. I eventually found that I had to duplicate all the earliest keyframes and drag them further along the timebar, so that they could prevent some of the later ones from activating too soon.

Thursday, April 23, 2009

Assignment #4

Click here to view the video that I created for this assignment.

Here is the .max file.

This project was more tedious than challenging. Since there is no 'repeat' button in 3DS Max, I had to move the limbs back into their retracted positions after I set up the punching animations, and then move them into their punching positions once again, and so on and so forth. However, once I got the swing of things, this process became faster than it was repetitive.


Wednesday, April 22, 2009

Assignment #3 Part 2


Above is the final draft of my underwater scene, complete with added textures.

Here is a link to the .max file.

This project was very time-consuming, but there isn't a piece of it that I'm not proud of. I love the way everything turned out; the lighting, the skins of the models, and the added fog effects stand out to me particularly, however. At first I thought the hardest part would be the sculpting stage, but I was proven wrong when I began working on the textures. Applying them was drastically harder than creating the models, which surprised me.


I used bumping for the rocks, the treasure chest and the terrain, and UVW mapping and unwrap UVW on the submarine and the eel. Also, back in the designing stage I used image planes to create the submarine. I have gone beyond the boundaries of this project by actually designing my own textures for two of the models featured; I designed the sub's metallic skin in photoshop, and I created the skin of the boulders by combining two different surface textures; a mossy one and a rocky one.
Overall, I was very pleased with the way my underwater scene turned out, and I look forward to doing more assignments like this in the future.

Wednesday, April 8, 2009

Assignment #3 Part I


Here is the underwater scene that I created for this project, along with close-up renders of the three objects featured in it.

Thursday, March 26, 2009

Assignment #3 Sketches


Here is a rough sketch of what my undersea scene for assignment #3 will look like.


Thursday, February 26, 2009

COSC 260 Assignment #2


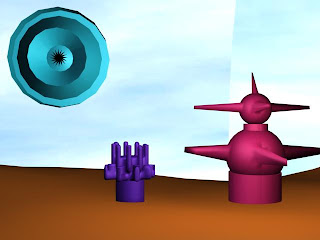
Here is an image of the sculptures that I designed for this assignment.
Click here to view the .max file.
All in all, I had some fun doing this exercise. I got to play around with 3D modeling and test my abilities for this first time; I didn't have the textbook directing me, so I was on my own and able to see what I can do with this program and what I need to get better at. The purple sculpture was created using extrude, while the circular form was created with lathe. The pinkish structure started out as a combination of two cylinders and two spheres united together using proboolean commands.
To go beyond the technical goals of this project, I did additional work on the sculptures by combining modifiers and techniques. After I finished creating the booleans, I turned the resulting object into an editable poly and then I stretched spikes out of the two spherical sections, making it look more unique. I also applied turbosmooth to the purple structure, which initially was hard and blocky-looking. The added modifier makes the sculpture look more at home in the surroundings; more like it is a part of the environment, and not something mechanical.
I had some difficulty with the lighting effects needed for this project; at one point, the the omni lights I had created were brightening out the skydome background to the point where it was not even visible! I had to spend some time re-adjusting and re-positioning the lights so that, while they brought out the detail in the objects, they weren't too bright, and they didn't effect the background of the image.


Wednesday, February 18, 2009

Introduction to 3D Graphics Presentation

Image used in PowerPoint

Taken from the second interview

The video
Starcraft II cinematic teaser
Internet sources
Nick Carpenter
-Interview #1
-Interview #2
-Career history
RenderMan software
Link #1
-Evidence of Blizzard's conversion to RenderMan
Link #2
-Wikipedia article on the software
References and artistic inspirations for Starcraft series
Link #1

Summary/Commentary
The vast majority of the information that I gathered for this project was attained from interviews with Nick Carpenter (Cinematic Creative Director at Blizzard). Once I located a name that was attached to the game's cinematics, finding all the information that I needed was easy. The second interview listed above gave me all the technical information that I needed regarding the way that the teams work together, and the areas that the software has advanced in. The first interview (as well as the site that lists all the games that Nick has worked on) gave me some insight into his career as a cinematic designer. The rest of the sources were picked up to evidence facts stated in my presentation.

My presentation makes it clear that the most notable step forward Blizzard is taking is the incorporation of movie-level CGI rendering into StarCraft II. I became very excited after reading about this, and I feel that it truly will impact the future of 3D graphics for videogames; as said in the presentation, if it's difficult to tell the difference between CGI models and actual human actors in movies today, then how real could this technology make videogames appear? One of the smaller details I acquired that interested me was the information on the art direction of the game; it is interesting to point out all of the designs and artwork that the StarCraft series has borrowed from previous Science Fiction outings. When reading Nick's statement about how the graphics are a vehicle that is sent towards crafting excellent characters and storylines, I found myself to agree with him completely; I felt that I had to put that statement into the slideshow. If the game features poor gameplay and a bad story, good graphics are basically useless by themselves. Overall, I found this project to be quite enjoyable; it was fun to research one of my favorite gaming companies, and I think the class will enjoy my findings, as well.